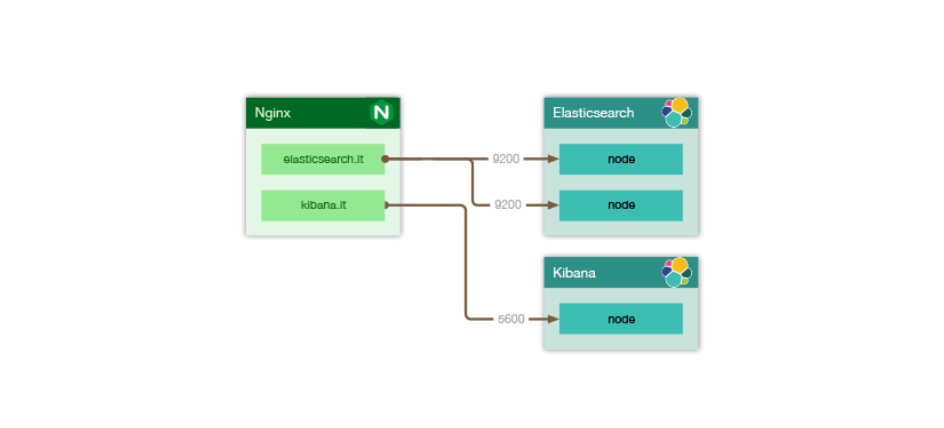
使用 Nginx 反向代理 Elastic Stack

预备环境⌗
假设 Elasticsearch 和 Kibana 已经使用 Docker 方式部署成功,没有部署的可以参考《Elastic Stack 之 Elasticsearch》和《Elastic Stack 之 Kibana》这两篇博文。
注意:Nginx 容器需要和 Elasticsearch 以及 Kibana 在同一网络内。
Nginx 配置文件⌗
Elasticsearch⌗
server {
    listen 80;
    server_name elasticsearch.example.com;
    return 308 https://$host$request_uri;
}

server {
    listen 443 ssl http2;
    server_tokens off;
    server_name elasticsearch.example.com;
    ssl_certificate /etc/nginx/cert/fullchain.cer;
    ssl_certificate_key /etc/nginx/cert/example.com.key;

    # Recommendations from https://raymii.org/s/tutorials/Strong_SSL_Security_On_nginx.html
    ssl_protocols TLSv1 TLSv1.1 TLSv1.2 TLSv1.3;
    ssl_ciphers '!aNULL:kECDH+AESGCM:ECDH+AESGCM:RSA+AESGCM:kECDH+AES:ECDH+AES:RSA+AES:';
    ssl_prefer_server_ciphers on;
    ssl_session_cache shared:SSL:10m;

    # disable any limits to avoid HTTP 413 for large image uploads
    client_max_body_size 0;

    # required to avoid HTTP 411: see Issue #1486 (https://github.com/docker/docker/issues/1486)
    chunked_transfer_encoding on;

        add_header Strict-Transport-Security max-age=15768000;

        # OCSP Stapling ---
        # fetch OCSP records from URL in ssl_certificate and cache them
        ssl_stapling on;
        ssl_stapling_verify on;

        ssl_trusted_certificate /etc/nginx/cert/ca-bundle.trust.crt;

    location / {
        proxy_pass http://elasticsearch:9200;
        proxy_set_header Host $host;
                proxy_set_header Upgrade $http_upgrade;
                proxy_set_header Connection "upgrade";
        proxy_set_header X-Real-IP $remote_addr;
        proxy_set_header X-Forwarded-For $proxy_add_x_forwarded_for;

        # When setting up Harbor behind other proxy, such as an Nginx instance, remove the below line if the proxy already has similar settings.
        proxy_set_header X-Forwarded-Proto $scheme;

        proxy_buffering off;
        proxy_request_buffering off;

                auth_basic "Please sign in elasticsearch";
                auth_basic_user_file /etc/nginx/auth/elasticsearch;
                autoindex on;
    }
}
Kibana⌗
server {
    listen 80;
    server_name kibana.example.com;
    return 308 https://$host$request_uri;
}

server {
    listen 443 ssl http2;
    server_tokens off;
    server_name kibana.example.com;
    ssl_certificate /etc/nginx/cert/fullchain.cer;
    ssl_certificate_key /etc/nginx/cert/example.com.key;

    # Recommendations from https://raymii.org/s/tutorials/Strong_SSL_Security_On_nginx.html
    ssl_protocols TLSv1 TLSv1.1 TLSv1.2 TLSv1.3;
    ssl_ciphers '!aNULL:kECDH+AESGCM:ECDH+AESGCM:RSA+AESGCM:kECDH+AES:ECDH+AES:RSA+AES:';
    ssl_prefer_server_ciphers on;
    ssl_session_cache shared:SSL:10m;

    # disable any limits to avoid HTTP 413 for large image uploads
    client_max_body_size 0;

    # required to avoid HTTP 411: see Issue #1486 (https://github.com/docker/docker/issues/1486)
    chunked_transfer_encoding on;

        add_header Strict-Transport-Security max-age=15768000;

        # OCSP Stapling ---
        # fetch OCSP records from URL in ssl_certificate and cache them
        ssl_stapling on;
        ssl_stapling_verify on;

        ssl_trusted_certificate /etc/nginx/cert/ca-bundle.trust.crt;

    location / {
        proxy_pass http://kibana:5601;
        proxy_set_header Host $host;
        proxy_set_header X-Real-IP $remote_addr;
        proxy_set_header X-Forwarded-For $proxy_add_x_forwarded_for;

        # When setting up Harbor behind other proxy, such as an Nginx instance, remove the below line if the proxy already has similar settings.
        proxy_set_header X-Forwarded-Proto $scheme;

        proxy_buffering off;
        proxy_request_buffering off;
    }
}
完成配置后,重启 Nginx 容器,或者保险一点进入容器测试配置文件是否能被加载:
$ nginx -t
$ nginx -s reload
然后访问 Elasticsearch 就会发现此时需要验证了。
I hope this is helpful, Happy hacking…