CentOS 7 Server Proxy Configuration

Architecture Diagram⌗
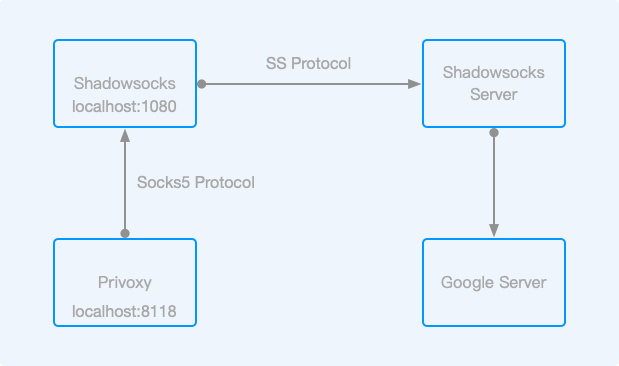
First, you need to start a Shadowsocks Local service locally to forward local Socks5 traffic to nodes that can access Google Server, and then use Privoxy to proxy HTTP and HTTPS requests from local port 8118 to the local Shadowsocks Local port 1080 (if your project supports Socks5 proxy, you can skip this step).
Installing Shadowsocks-libev⌗
$ cd /etc/yum.repos.d/
$ wget https://copr.fedoraproject.org/coprs/librehat/shadowsocks/repo/epel-7/librehat-shadowsocks-epel-7.repo
$ yum update
$ yum install shadowsocks-libev
Configuring Shadowsocks⌗
$ vim /etc/shadowsocks-libev/config.json
{
  "server":"server_address",
  "server_port":38372,
  "local_port":1080,
  "local_address":"127.0.0.1",
  "password":"xxxxxxxxxxx",
  "timeout":60,
  "method":"aes-256-cfb"
}
- server: SS server address or domain name
- server_port: SS server port
- local_address: Local Socks5 service listening address
- local_port: Local Socks5 service listening port
- password: Password to connect to the remote SS server
- method: Encryption method
Starting the Service⌗
$ sudo systemctl enable shadowsocks-libev #Enable auto-start at boot
$ sudo systemctl start shadowsocks-libev
Testing if the Connection is Working⌗
$ curl -x socks5h://localhost:1080 ip.sb
ip.sb is used to get the current public IP address. If the proxy node’s IP is correctly returned, it means the service is running normally.
Installing Privoxy⌗
The main function of Privoxy is to forward local HTTP traffic to the Socks5 service port. For example, if a PHP project needs to access Google API, it can use HTTP proxy. If you don’t need HTTP or HTTPS proxy, you can ignore the following content.
$ sudo yum install privoxy
Modifying the Configuration File⌗
# Uncomment the forward-socks5t line and modify it to the following content (with a "." at the end):
forward-socks5t   /   127.0.0.1:1080 .

# Uncomment the following lines to set local IP not to be forwarded
forward         192.168.*.*/     .
forward            10.*.*.*/     .
forward           127.*.*.*/     .
forward           localhost/     .
Starting the Service⌗
$ sudo systemctl enable privoxy #Enable auto-start at boot
$ sudo systemctl start privoxy #Start the service
$ sudo systemctl status privoxy #Check service status
If it cannot start, there might be an issue with the privoxy.service file. Modify the unit file /lib/systemd/system/privoxy.service as follows:
[Unit]
Description=Privoxy Web Proxy With Advanced Filtering Capabilities
Wants=network-online.target
After=network-online.target

[Service]
Type=simple
PIDFile=/run/privoxy.pid
ExecStart=/usr/sbin/privoxy --no-daemon --pidfile /run/privoxy.pid --user privoxy /etc/privoxy/config

[Install]
WantedBy=multi-user.target
The default Type is forking, which should be changed to simple, and add the --no-daemon parameter to the ExecStart command. This way, Systemd can gain control of the privoxy process.
Testing⌗
$ export http_proxy=http://127.0.0.1:8118
$ export https_proxy=http://127.0.0.1:8118
$ curl ip.sb #No need to configure proxy anymore, as the above commands have already configured global proxy for the current session
If you want to set the proxy permanently, you can edit one of the following files:
- /etc/profile
- ~/.bashrc
- ~/.zshrc
export http_proxy=http://127.0.0.1:8118
export https_proxy=http://127.0.0.1:8118
After completion, execute the following command to make the environment variables take effect:
$ source FILE #FILE is the environment variable file you edited
Now you can happily develop projects based on Google login.
I hope this is helpful, Happy hacking…